Non Verbal Logic
1. 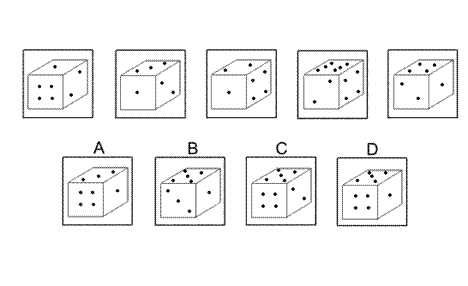
Solution: D Explanation: In this question there is a die with six faces containing 1, 2, 3, 4, 5 and 6 dots respectively. The die is rotated by 90° anticlockwise about each of the two axes of symmetry shown in the diagram. These rotations are performed alternately - first a rotation about Axis 1, then a rotation about Axis 2, then back to Axis 1, etc. Following these rules, the next rotation should be about Axis 1 and the correct answer is D. (Note that it can be deduced from the previous diagrams which faces of the die are opposite each other. This follows the simple rule that the numbers on opposite faces always add to 7.)
2. 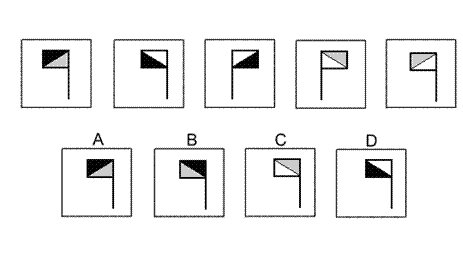
Solution: B Explanation: In this question there are two different designs of flag depending on which way the diagonal is drawn. There are two rules to follow alternately. The first rule is that the design of flag changes and at the same time the colours change - black/grey changes to white/black, changes to grey/white, then back to black/grey etc. The second rule is that the flag is reflected in the vertical axis. In this case the colours do not change. For the next diagram of the sequence, therefore, the first rule must be applied. We change to the other design of flag and the colours change to black/grey. The correct answer, therefore, is B.
3. 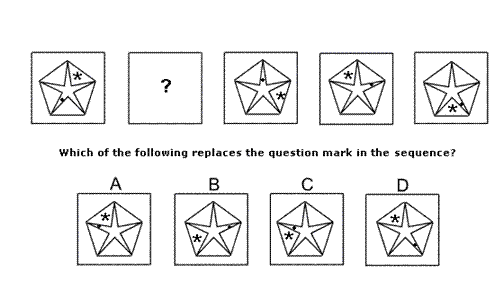
Solution: C Explanation: In this question there is a five pointed star inside a regular pentagon. There is also an asterisk and a dot. The dot moves around the inside points of the five-pointed star, rotating by 72° clockwise each time. The asterisk moves around the five triangles between the star and the regular pentagon and rotates by 144° anticlockwise each time. When both of these rules are applied simultaneously, the missing diagram of the sequence must be C.
4. 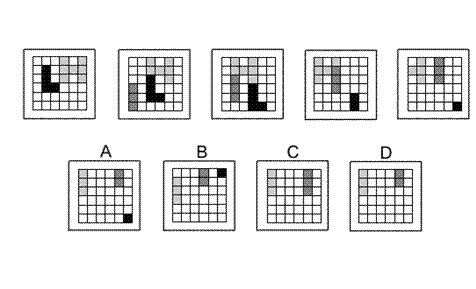
Solution: D Explanation: In this question there is a grid of squares with a black L shape, a light grey H shape and a dark grey I shape. Each time, the L shape moves right one place and down one place. Each time, the H shape moves to the left one place. Where the L intersects with the H, the black colour of the L obscures the light grey of the H. Where the I intersects with the H, the dark grey of the I obscures the light grey of the H. The I shape does not appear in the first diagram, but then moves one place right and one place up each time. When any of the shapes reach an edge of the grid, the parts that move off from the grid disappear. Following these rules, the next diagram of the sequence must be D.
5. 
Solution: A Explanation: In this question there are eight matchsticks of two different colours. Each time, the middle two matchsticks are turned upside down and then the matchstick on the far right is moved to the left. When these two rules are applied simultaneously, the correct answer is A.
6. 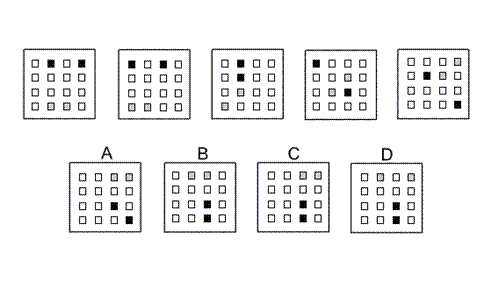
Solution: C Explanation: In this question there are two grey and two black squares that follow their own paths. The two grey squares start in the bottom row of the grid and follow a Zshaped path, moving one place each time - firstly towards the left in the bottom row, then up the diagonal of the Z-shape, then left again across the top row. The two black squares start in the top row of the grid and follow a backwards Zshaped path, moving one place each time - firstly towards the left along the top row, then down the diagonal of the backwards Z-shape, then towards the left again in the bottom row. The correct answer, therefore, is C.
7. 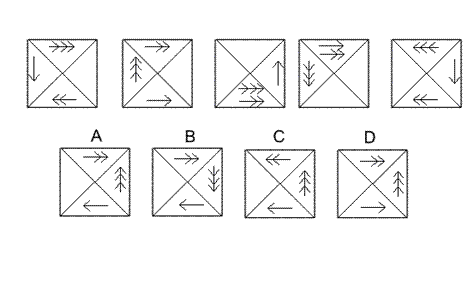
Solution: A Explanation: In this question the arrows move around the outside of the grid according to the direction of the arrowheads and a number of places given by the number of arrowheads. However, when two arrows occupy the same quarter of the diagram, the direction of the arrowheads on both arrows reverses. For the next diagram of the sequence, therefore, the arrow with one arrowhead moves one place clockwise, the arrow with two arrowheads moves two places clockwise and the arrow with three arrowheads moves three places anticlockwise. Since none of them then occupy the same quarter of the diagram, none of the arrowheads are reversed. The correct answer, therefore, is A.
8. 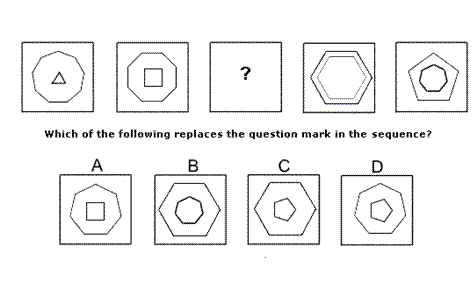
Solution: D Explanation: In this question each diagram shows a regular polygon inside another regular polygon. The number of sides of the outer polygon decreases by one each time. The number of sides of the inner polygon increases by one each time. The sum of the sides of the two polygons is always 12. For the missing diagram of the sequence, therefore, there should be a regular pentagon (five sided polygon) inside a regular heptagon (seven-sided polygon). The correct answer, therefore, is D.
9. 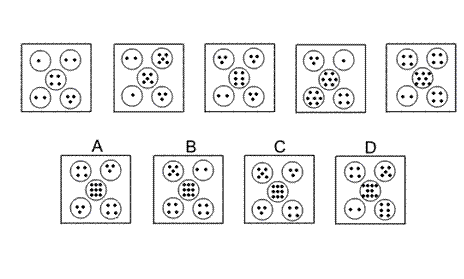
Solution: C Explanation: In this question there are two rules to follow. The first rule is that the number of dots in the centre circle increases by one each time. Following this rule, for the next diagram of the sequence, there should be nine dots in the centre circle. The correct answer, therefore, could be A, B or C. The second rule is that the number of dots in the centre circle is always equal to the sum of the numbers of dots in the top left and bottom right circles, and the product of the numbers of dots in the top right and bottom left circles. Since 5 + 4 = 9 and 3 × 3 = 9, the correct answer must be C.
10. 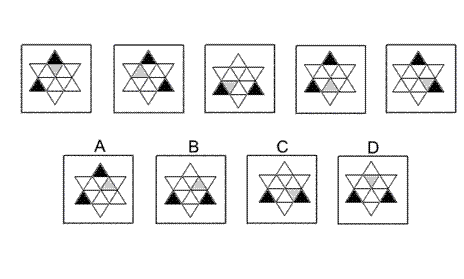
Solution: B Explanation: In this question the six triangles around the outside of the shape rotate by 120° clockwise each time and the six triangles in the middle of the shape rotate by 60° anticlockwise each time. Following these rules, the next diagram of the sequence must be B.
11. 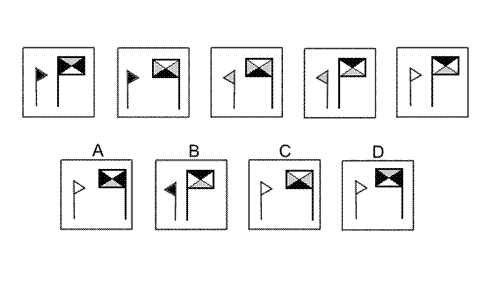
Solution: D Explanation: In this question there are two rules to follow. The first rule is that the two flags take it in turns to change direction. For the next diagram of the sequence, therefore, the big flag should change direction. The correct answer could be A, C or D. The second rule concerns the colours of the five triangles. If a flag does not change direction, then the colours stay the same. However, if a flag does change direction then the colours change as follows: black changes to grey, grey changes to white and white changes to black. For the next diagram, since only the big flag changes direction, the colour of the small flag should remain as white, but the colours of the big flag should change according to this rule. The correct answer, therefore, is D.
| 1 | 2 | 3 | 4 | 5 | 6 | 7 | 8 | 9 | 10 | 11 | 12 | 13 | 14 | 15 | 16 | 17 | 18 | 19 | 20 |
| 21 | 22 | 23 | 24 | 25 | 26 | 27 | 28 | 29 | 30 | 31 | 32 | 33 | 34 | 35 | 36 | 37 | 38 | 39 | 40 |
| 41 | 42 | 43 | 44 | 45 | 46 | 47 | 48 | 49 | 50 | 51 | 52 | 53 | 54 | 55 | 56 | 57 | 58 | 59 | 60 |
| 61 | 62 | 63 | 64 | 65 | 66 | 67 | 68 | 69 | 70 | 71 | 72 | 73 | 74 | 75 | 76 | 77 | 78 | 79 | 80 |
| 81 | 82 | 83 | 84 | 85 | 86 | 87 | 88 |
 Passage Reading
 Verbal Logic
 Non Verbal Logic
 Numerical Logic
 Data Interpretation
 Reasoning
 Analytical Ability
 Basic Numeracy
 About Us
 Contact
 Privacy Policy
 Major Tests
 FAQ
FAQ

